
Lower back pain is a common complaint across Australia, affecting everyone from office workers in Sydney to tradies in Melbourne. While it can be debilitating, living with persistent aches and stiffness doesn’t have to be your reality. The key to long-term relief often lies not in complete rest, but in targeted, safe movement designed to build strength and improve mobility. This guide moves beyond generic advice to provide a curated list of eight evidence-informed exercises for lower back pain, specifically chosen for their effectiveness and safety.
This is your practical roadmap to building a stronger, more resilient back. We’ll break down not just what to do, but precisely how to do it correctly, with step-by-step instructions, recommended sets and repetitions, and common mistakes to avoid. Drawing on insights from trusted Australian health resources like Healthdirect Australia and the Australian Physiotherapy Association, each exercise is selected to help stabilise the core, lengthen tight muscles, and support proper spinal alignment.
Forget the guesswork. In this comprehensive listicle, you will discover how to:
- Activate deep core muscles that protect your spine.
- Improve hip mobility to reduce strain on your lower back.
- Perform each movement safely with clear modifications for all fitness levels.
- Recognise warning signs and understand when it’s crucial to seek professional care.
We will explore the science behind why these specific movements work, providing you with the tools and knowledge needed to manage discomfort and set the foundation for a more active, pain-free future.
1. Dead Bug Exercise: The Foundation of Core Stability
Don’t let the unusual name fool you; the Dead Bug is one of the safest and most effective exercises for lower back pain. It’s a core stabilisation exercise performed lying on your back, focusing on coordinated movement while keeping your spine perfectly still. This makes it a gold standard among Australian physiotherapists for building foundational strength without compressing or straining the lumbar spine.
The magic of the Dead Bug lies in its ability to target the deep core muscles, particularly the transverse abdominis. This muscle acts like a natural corset, wrapping around your midsection to support your spine and pelvis. When it’s strong, it creates a stable base that reduces excessive movement and shear forces on your lower back during daily activities.
How to Perform the Dead Bug
Follow these steps to ensure correct form and maximise the benefits of this foundational exercise for lower back pain.
- Starting Position: Lie on your back with your knees bent and feet flat on the floor. Raise your legs so your shins are parallel to the floor, creating a 90-degree angle at your hips and knees (the “tabletop” position). Extend your arms straight up towards the ceiling.
- Engage Your Core: Gently flatten your lower back towards the floor, engaging your abdominal muscles. Imagine you are trying to prevent a small blueberry from being squashed under the arch of your back, maintaining a slight, natural curve.
- The Movement: Exhale slowly as you lower your right arm and left leg towards the floor simultaneously. Go only as far as you can without letting your lower back arch or your ribcage flare up.
- Return to Start: Inhale as you bring your arm and leg back to the starting tabletop position with control.
- Alternate Sides: Repeat the movement with your left arm and right leg. This completes one repetition.
Sets, Reps, and Progression
- Beginner: Aim for 2-3 sets of 8-12 total repetitions (4-6 per side). Focus purely on maintaining a stable core and moving slowly.
- Progression: To increase the challenge, try holding a light weight (like a water bottle) in each hand or attaching light ankle weights. Another great option is to perform all reps on one side before switching to the other, which increases the time under tension for your stabilising muscles.
- Common Mistake to Avoid: The most frequent error is arching the lower back as the arm and leg lower. This disengages the core and can strain the back. If you notice your back lifting, reduce your range of motion. Only lower your limbs as far as you can with perfect control.
2. Bird Dog Exercise: Building a Stable and Resilient Spine
The Bird Dog is another cornerstone exercise for lower back pain, prized for its ability to enhance core control and spinal stability from a different angle. Performed on all fours, it challenges your body to resist rotation while moving opposite limbs, directly targeting the muscles that support and protect your lumbar spine, including the multifidus and erector spinae.
This exercise is fundamental in physical therapy programs across Australia because it trains muscular endurance and proprioception, your body’s awareness of its position in space. By strengthening the connection between your brain and your back muscles, the Bird Dog teaches your body to maintain a neutral, safe spinal position during movement, a crucial skill for preventing re-injury.
How to Perform the Bird Dog
Follow these steps to ensure you perform this core-strengthening exercise for lower back pain correctly and safely.
- Starting Position: Begin on your hands and knees in a “tabletop” position. Your hands should be directly under your shoulders and your knees directly under your hips. Keep your back flat and your neck in line with your spine.
- Engage Your Core: Brace your abdominal muscles as if you are about to be lightly punched in the stomach. This creates a rigid torso and prevents your back from sagging.
- The Movement: Exhale as you simultaneously extend your right arm straight forward and your left leg straight back. Aim to create one long, straight line from your fingertips to your heel. Keep your hips and shoulders square to the floor.
- Hold and Return: Hold the extended position for 2-3 seconds, focusing on stability. Inhale as you slowly and with control, lower your arm and leg back to the starting position.
- Alternate Sides: Repeat the movement with your left arm and right leg. This completes one repetition.
Sets, Reps, and Progression
- Beginner: Aim for 2-3 sets of 10-15 total repetitions (5-8 per side). The key is slow, controlled movement, not speed.
- Progression: To make it more challenging, you can perform all reps on one side before switching. Another excellent progression is to place a small, stable object (like a yoga block or rolled-up towel) on your lower back and perform the exercise without letting it fall.
- Common Mistake to Avoid: The most common error is rotating the hips or arching the lower back to lift the leg higher. This defeats the purpose of the exercise. Only lift your leg as high as you can while keeping your hips perfectly level and your back straight. Filming yourself from the side can help you spot this error.
3. Cat-Cow Stretch (Marjaryasana-Bitilasana): Mobilising the Spine
A cornerstone of both yoga and physiotherapy, the Cat-Cow stretch is a gentle, dynamic movement designed to increase spinal flexibility and relieve tension. It’s one of the most frequently recommended exercises for lower back pain because it encourages controlled movement through the entire vertebral column, from your tailbone to your neck. This motion helps to hydrate the intervertebral discs and reduce stiffness, making it an ideal warm-up or daily mobility routine.
The benefit of the Cat-Cow lies in its gentle oscillation between spinal flexion (the “Cat” position) and extension (the “Cow” position). This rhythmic movement helps to improve body awareness and control, teaching you to move your spine segment by segment. For those suffering from stiffness related to prolonged sitting, this stretch provides immediate relief by waking up dormant back muscles and promoting healthy circulation to the spinal tissues.
How to Perform the Cat-Cow Stretch
Follow these steps for a safe and effective stretch that nurtures your spine and alleviates lower back pain.
- Starting Position: Begin on your hands and knees in a “tabletop” position. Ensure your wrists are directly under your shoulders and your knees are directly under your hips. Your back should be flat and your neck in a neutral position, looking down at the floor.
- Cow Pose (Inhale): As you inhale, gently drop your belly towards the floor. Lift your chest and tailbone towards the ceiling, creating a gentle arch in your spine. Avoid crunching your neck; instead, keep your gaze forward.
- Cat Pose (Exhale): As you exhale, round your spine upwards towards the ceiling. Tuck your chin towards your chest and press firmly through your hands, feeling a stretch across your shoulder blades and lower back.
- The Flow: Continue to flow smoothly between Cow Pose on the inhale and Cat Pose on the exhale, coordinating your breath with the movement.
Sets, Reps, and Progression
- Beginner: Aim for 1-2 sets of 8-12 full cycles (one inhale and one exhale equals one cycle). Focus on slow, fluid movements synchronised with your breath.
- Progression: While Cat-Cow is not typically about building strength, you can deepen the stretch by holding each position for a few extra seconds. You can also add variations like threading the needle or extending the opposite arm and leg (a Bird-Dog) between cycles to challenge your stability.
- Common Mistake to Avoid: A common error is forcing the movement, especially in the neck or lower back. This should be a gentle, flowing exercise, not an extreme stretch. If you feel any sharp pain, reduce your range of motion immediately. The goal is mobilisation, not maximum arching or rounding.
4. Glute Bridge Exercise: Awakening Your Powerhouse Muscles
The Glute Bridge is a fundamental yet powerful exercise for alleviating lower back pain, focusing on strengthening the muscles that are often the root cause of discomfort: the glutes. When your gluteal muscles are weak or inactive, your lower back and hamstrings are forced to compensate, leading to overuse, strain, and chronic pain. This exercise effectively isolates and activates the glutes, teaching them to fire properly and take the load off your lumbar spine.
Popularised by strength coaches and Australian physiotherapists, the Glute Bridge is a staple in rehabilitation and injury prevention programs. It works by creating posterior pelvic tilt and hip extension, movements that directly counteract the effects of prolonged sitting. A strong set of glutes provides a stable foundation for your pelvis, which in turn supports a healthy, neutral spine, making this one of the most essential exercises for lower back pain.
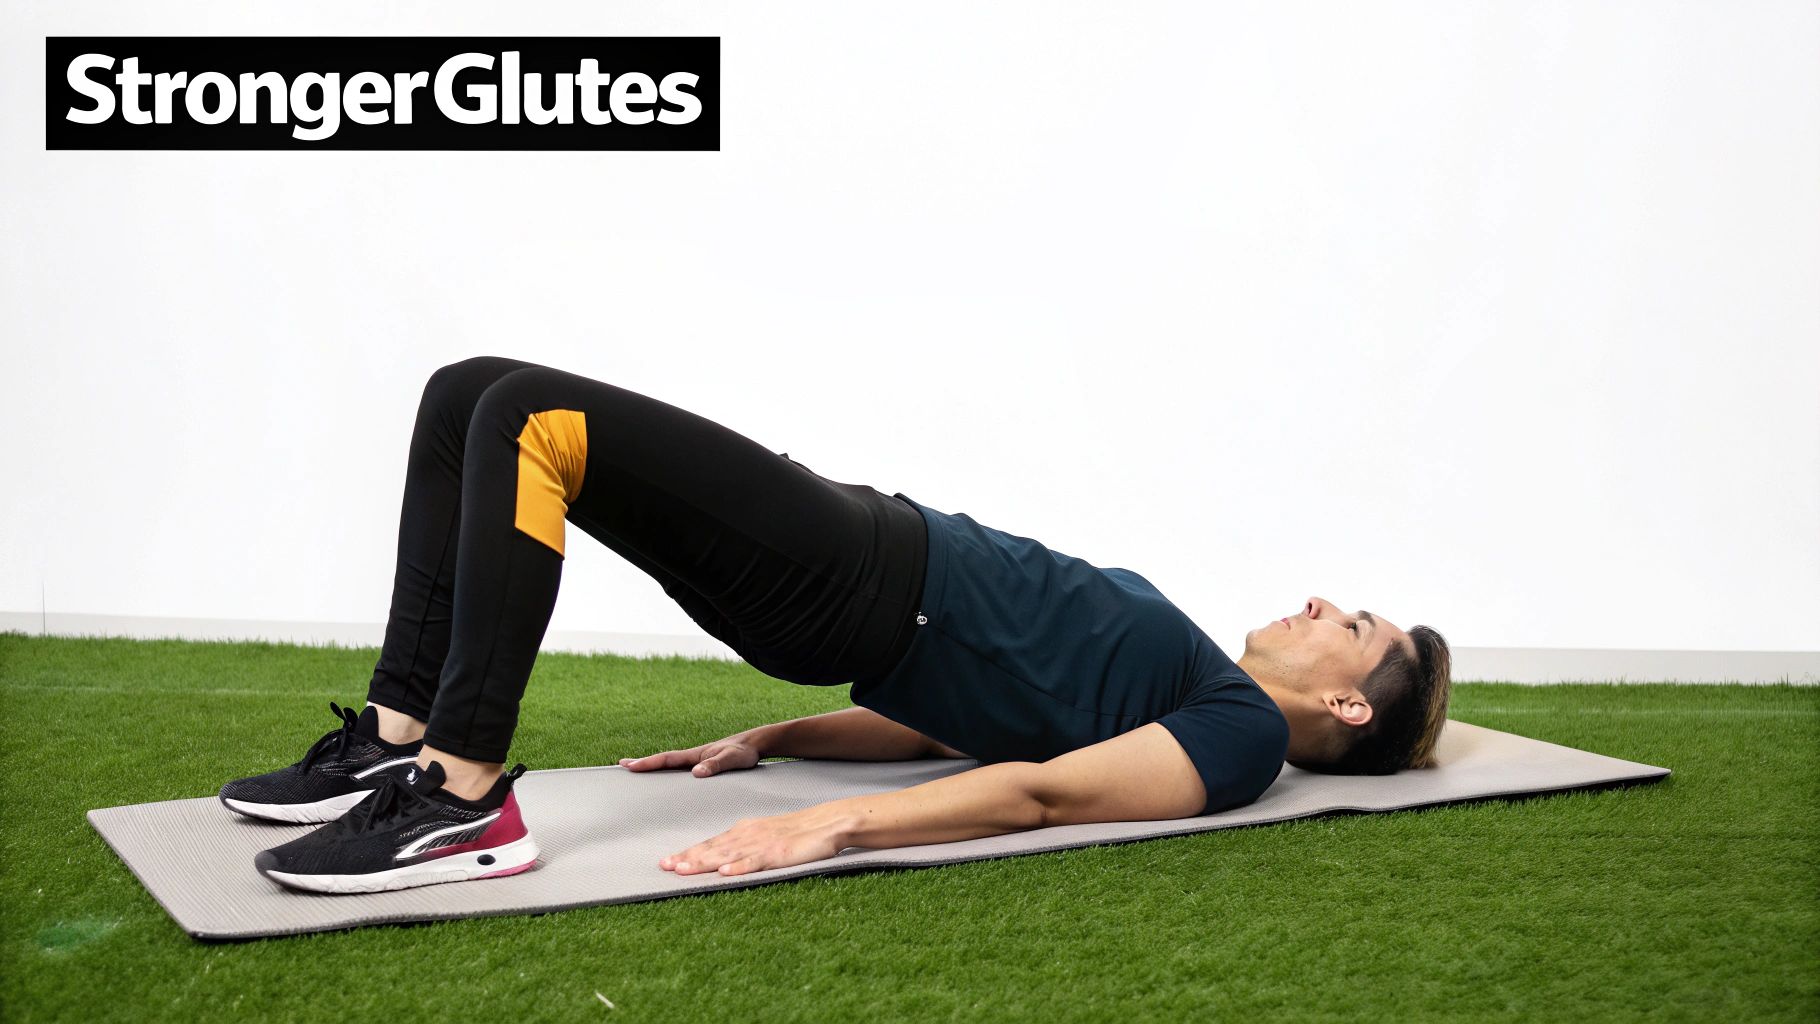
How to Perform the Glute Bridge
Follow these steps to ensure you’re activating your glutes correctly and protecting your lower back.
- Starting Position: Lie on your back with your knees bent, feet flat on the floor about hip-width apart, and your heels a comfortable distance from your buttocks. Place your arms by your sides with your palms facing down.
- Engage Your Core: Gently brace your abdominal muscles and ensure your lower back is in a neutral position, not overly arched or pressed flat.
- The Movement: Exhale as you press through your heels and squeeze your glutes to lift your hips off the floor. Raise them until your body forms a straight line from your shoulders to your knees. Pause at the top and give your glutes an extra squeeze.
- Return to Start: Inhale as you slowly lower your hips back down to the floor with control.
- Repeat: This completes one repetition. Perform the movement smoothly without rushing.
Sets, Reps, and Progression
- Beginner: Aim for 2-3 sets of 10-15 repetitions. The primary goal is to feel a strong contraction in your glutes, not your lower back or hamstrings.
- Progression: To make it more challenging, you can progress to a single-leg Glute Bridge, which dramatically increases the stability demand. Alternatively, place a resistance band around your thighs (just above the knees) to engage your hip abductors, or place a weight across your hips.
- Common Mistake to Avoid: The most common error is hyperextending the lower back at the top of the movement. This happens when you lift your hips too high using your spinal erectors instead of your glutes. This can cause compression and pain. Focus on lifting by squeezing your glutes, not by arching your back. If you feel it in your lower back, lower your hips slightly.
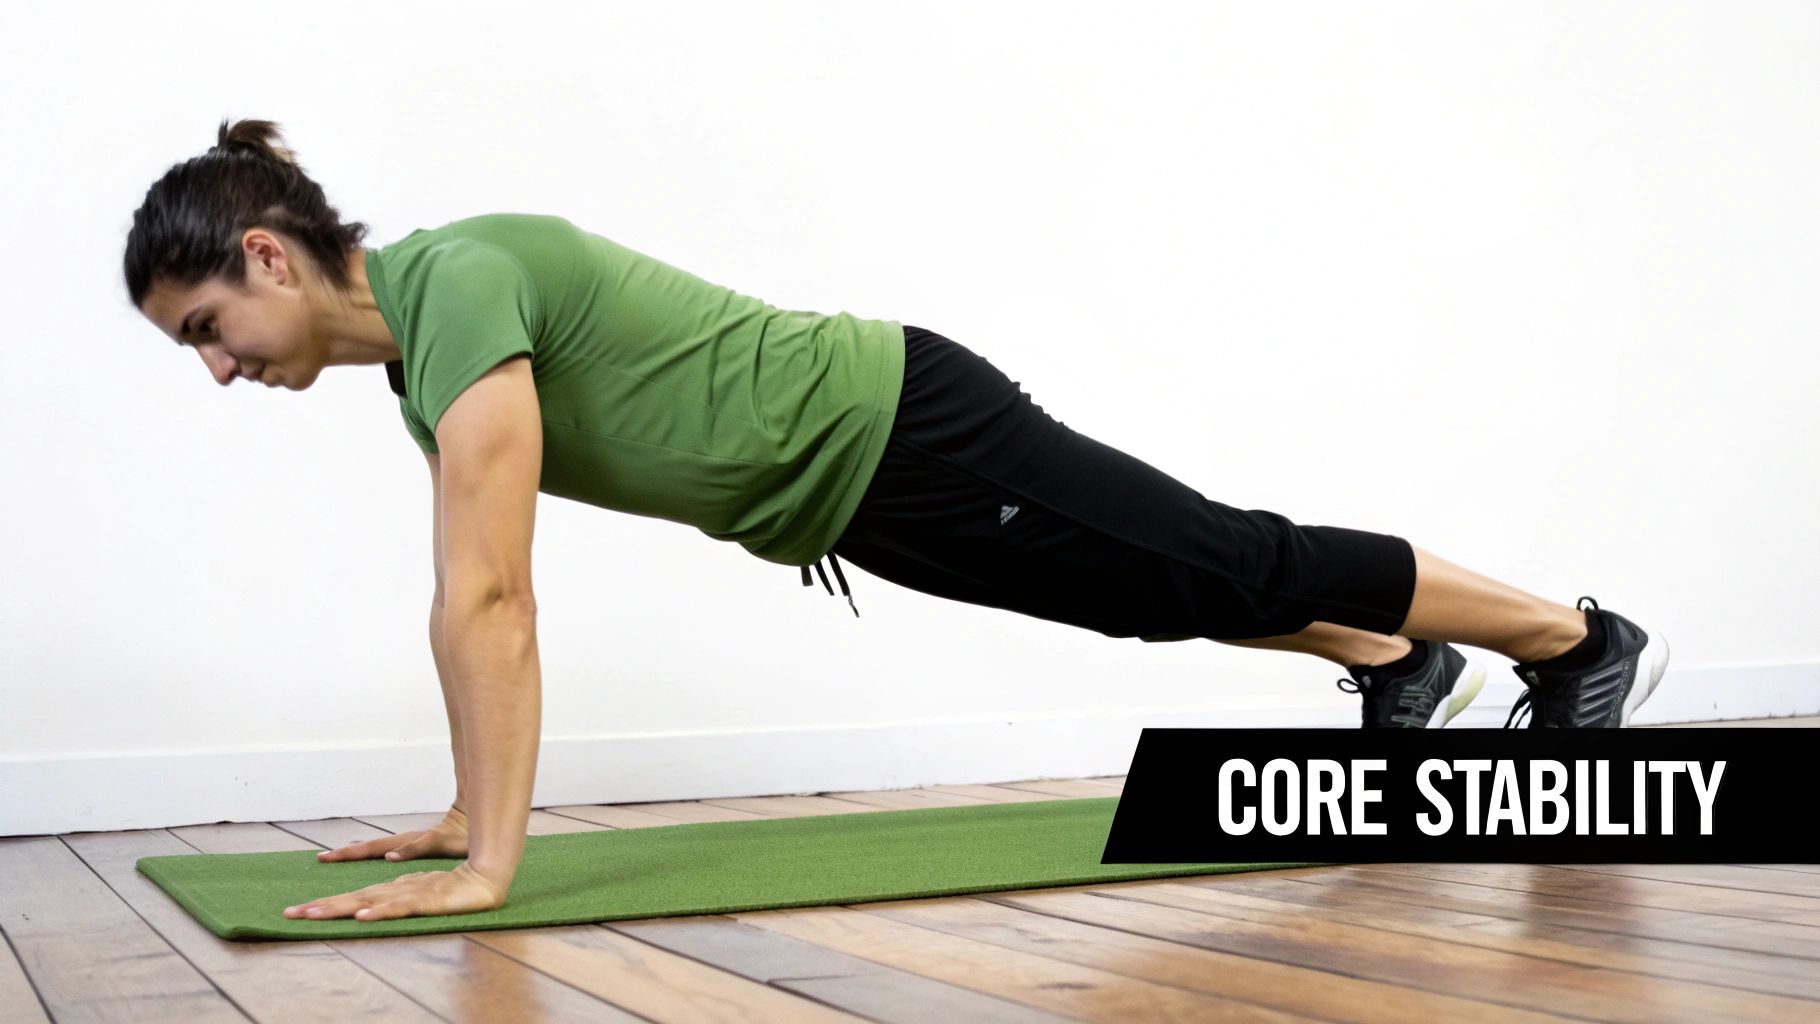
5. Quadruped Supine Hold (Planks and Modified Variations)
While the name might sound technical, the Quadruped Supine Hold and its variations, commonly known as the plank, are powerhouse exercises for lower back pain. This isometric hold challenges the endurance of your entire core musculature, teaching your abdominal, back, and glute muscles to work together to support and stabilise your spine. For many Australians dealing with back pain, building this kind of muscular endurance is key to preventing fatigue-related posture breakdown and subsequent strain.
The plank’s effectiveness comes from its ability to build strength without movement through the lumbar spine. By holding a rigid, neutral position, you train the deep core muscles, including the transverse abdominis and multifidus, to fire and protect your back. A strong, stable core acts as a natural brace, distributing forces more evenly during everyday tasks like lifting groceries or even just sitting at a desk, which is a major benefit for office workers.
How to Perform the Plank (Modified Knee Version)
Follow these steps for a safe and effective plank, starting with a modified version that is ideal for beginners and those with significant lower back pain.
- Starting Position: Begin on all fours, with your hands directly under your shoulders and your knees directly under your hips. Place your forearms on the floor, ensuring your elbows are aligned beneath your shoulders and your palms are flat.
- Engage Your Core: Gently draw your belly button in towards your spine and squeeze your glutes. Your body should form a straight line from your head to your knees. Avoid letting your hips sag or rise too high.
- The Hold: Maintain this position, breathing steadily. Keep your neck in a neutral position by looking at the floor slightly in front of your hands. Focus on keeping your core and glutes tight throughout the hold.
- Release: After holding for the desired time, gently lower your knees (if performing a full plank) and hips back to the floor to rest.
Sets, Reps, and Progression
- Beginner: Start with a modified plank on your knees. Aim for 2-3 sets, holding for 15-30 seconds each. Focus on perfect form over duration.
- Progression: Once you can comfortably hold the knee plank, progress to a full plank on your toes. Gradually increase your hold time, aiming for 45-60 seconds. You can also add variations like a side plank to target the obliques, which provide lateral support for the spine.
- Common Mistake to Avoid: The most common error is allowing the lower back to sag or arch. This indicates your core has disengaged and places compressive stress on your lumbar spine. If you feel your hips dropping, end the set, rest, and try again for a shorter duration with better form. It’s better to hold a perfect 15-second plank than a sloppy 60-second one.
6. Child’s Pose (Balasana): The Restorative Release
While many exercises focus on strengthening, Child’s Pose, or Balasana, offers a different yet equally crucial benefit: gentle, restorative release. This classic yoga pose is a passive stretch that allows the muscles of the lower back to lengthen and decompress, making it an exceptional exercise for lower back pain relief, especially after a long day of sitting or standing. It creates space between the vertebrae, eases tension in the hips, and calms the nervous system.
The power of Child’s Pose is in its simplicity and accessibility. It doesn’t demand intense muscular effort; instead, it encourages relaxation and deep breathing. By allowing your torso to rest over your thighs, you gently traction your lumbar spine, alleviating the compressive forces that often contribute to discomfort. This makes it a go-to pose for Australian yoga therapists and physiotherapists to include in cool-downs and pain management routines.
How to Perform Child’s Pose
Follow these steps to safely sink into this restorative pose and give your lower back the relief it needs.
- Starting Position: Begin on your hands and knees on a comfortable surface. Bring your big toes to touch and widen your knees slightly, about as wide as your hips or the mat.
- The Movement: Exhale and slowly sit your hips back towards your heels. As you do this, walk your hands forward, lowering your torso down between your thighs.
- Final Position: Rest your forehead gently on the floor. Your arms can either be extended straight out in front of you or relaxed alongside your body with your palms facing up. Focus on breathing deeply into your back, feeling it expand with each inhale and soften with each exhale.
- Hold: Stay in this position for 30 seconds to 3 minutes, focusing on letting go of any tension in your back, neck, and shoulders.
Duration, Frequency, and Modifications
- Recommendation: Hold the pose for at least 30 seconds, aiming for 1-3 minutes for a deeper release. It can be performed several times throughout the day, particularly when you feel your back stiffening up.
- Modifications: If you feel discomfort in your knees or hips, place a rolled-up towel or a small cushion between your thighs and calves for extra support. If your head doesn’t comfortably reach the floor, rest it on a stacked pair of fists, a yoga block, or a firm pillow to keep your neck in a neutral position.
- Common Mistake to Avoid: A common error is forcing your hips down to your heels, which can strain your knees or hips. Only go as far back as is comfortable. The goal is a gentle stretch in the lower back, not intense sensation in the joints. Let gravity do the work and focus on your breath to deepen the release over time.
7. Supine Hamstring Stretch: Releasing Pelvic Tension
Often overlooked, the connection between tight hamstrings and lower back pain is significant. The Supine Hamstring Stretch is a safe, passive stretch that directly targets these powerful muscles at the back of your thighs. When your hamstrings are tight, they pull down on the ischial tuberosities (your “sit bones”), causing the pelvis to tilt backward. This posterior pelvic tilt flattens the natural curve of your lumbar spine, increasing stress on the discs and joints, making it a critical flexibility exercise for lower back pain.
This stretch is a staple in physiotherapy and athletic training programs across Australia because it effectively isolates the hamstrings without placing compensatory strain on the lower back, which can happen with standing hamstring stretches. By lengthening these muscles, you restore proper pelvic alignment and reduce the chronic tension that contributes to lumbar discomfort, allowing your lower back to rest in a more neutral, pain-free position.
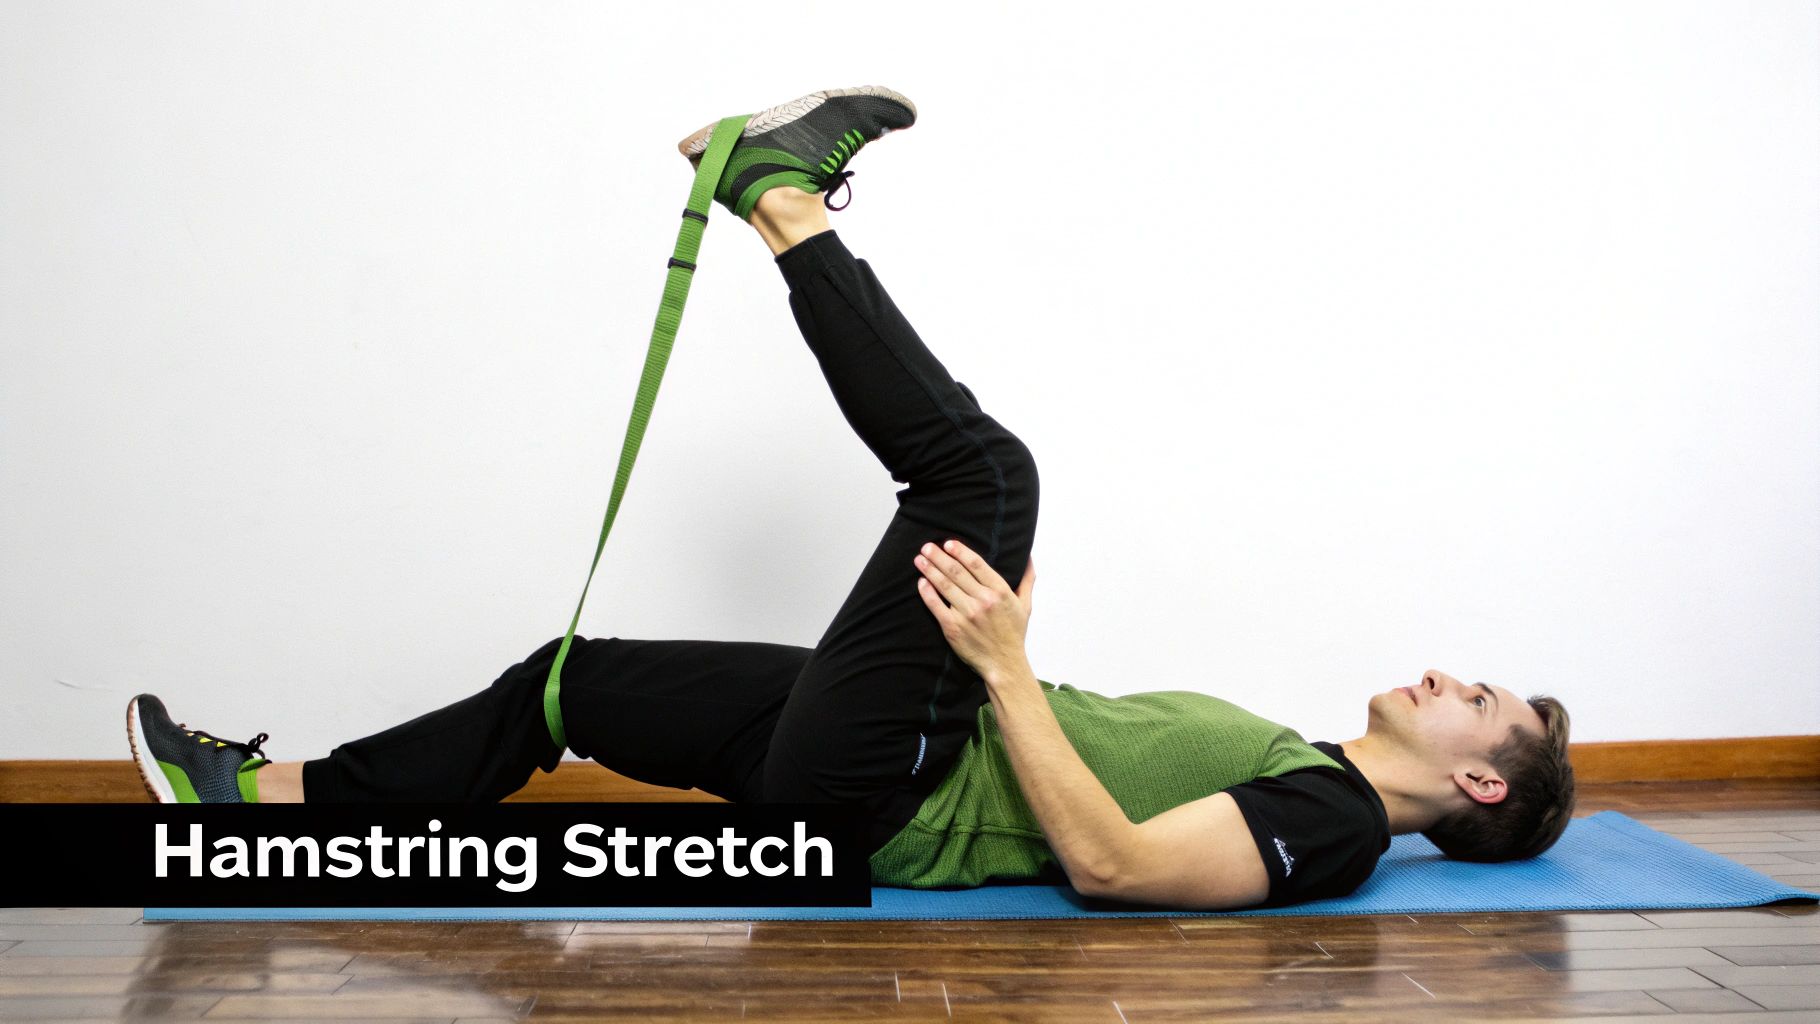
How to Perform the Supine Hamstring Stretch
Follow these steps to safely lengthen your hamstrings and alleviate pressure on your lower back.
- Starting Position: Lie on your back with both knees bent and your feet flat on the floor. You can place a small, rolled-up towel under your head for comfort if needed.
- Engage the Core: Gently draw your belly button towards your spine to maintain a neutral pelvic position. This prevents your lower back from arching during the stretch.
- The Movement: Loop a towel, yoga strap, or resistance band around the arch of your right foot. Holding the ends of the strap, slowly straighten your right leg up towards the ceiling. Keep a very slight bend in the knee to avoid hyperextension.
- Hold the Stretch: Gently pull on the strap to bring your leg closer to your chest until you feel a comfortable stretch along the back of your thigh. Your non-stretching leg (the left one) should remain bent with the foot flat on the floor to stabilise your pelvis.
- Alternate Sides: Hold the stretch, then slowly release and repeat on the left leg.
Sets, Reps, and Progression
- Beginner: Hold the stretch on each side for 30-60 seconds. Repeat 2-3 times per leg. Focus on breathing deeply and relaxing into the stretch rather than forcing it.
- Progression: To deepen the stretch, you can try to straighten the non-stretching leg flat along the floor, but only if you can do so without your lower back arching excessively. You can also gradually increase the hold time up to 2 minutes as your flexibility improves.
- Common Mistake to Avoid: The most common error is allowing the lower back to lift off the floor or rounding it to try and get the leg higher. This negates the benefit and can irritate the spine. The goal is to feel the stretch in the belly of the hamstring muscle, not to touch your toes. Keep your pelvis and back stable and only move the leg.
8. Quadriceps and Hip Flexor Stretch: Releasing Pelvic Tension
Often overlooked, the muscles at the front of your hips and thighs can be major culprits behind lower back pain. The Quadriceps and Hip Flexor Stretch directly targets these muscle groups, which, when tight, can pull your pelvis forward into an excessive anterior tilt. This postural imbalance increases the curve in your lumbar spine (lordosis), compressing the joints and straining the lower back muscles.
Releasing this tension is a game-changer for many, especially office workers who spend hours sitting. This stretch helps to restore proper pelvic alignment, creating a more balanced and neutral spine. By improving flexibility in the front of the body, you allow the muscles in the back, like the glutes and hamstrings, to function more effectively, providing better support for your lower back. It’s a crucial component of any well-rounded program of exercises for lower back pain.
How to Perform the Quadriceps and Hip Flexor Stretch
The half-kneeling variation is often the safest and most effective way to isolate these muscles without compromising your lower back.
- Starting Position: Kneel on a soft surface, like a yoga mat or carpet. Step your left foot forward so your left knee is bent at a 90-degree angle, directly over your ankle. Your right knee should be on the floor, directly under your right hip. Place your hands on your left thigh for support.
- Engage Your Core: Before you begin the stretch, brace your abdominal muscles and gently tuck your tailbone under. This action, known as a posterior pelvic tilt, is the most important part of the exercise as it protects your lower back and isolates the hip flexors.
- The Movement: Keeping your core engaged and your back straight, slowly lunge forward into your front leg. You should feel a gentle to moderate stretch in the front of your right hip and down your thigh. Avoid arching your back.
- Hold and Breathe: Hold the stretch for at least 30 seconds, breathing deeply. Focus on relaxing the muscles you are stretching.
- Alternate Sides: Carefully return to the starting position and switch legs, repeating the stretch on the other side.
Sets, Reps, and Progression
- Beginner: Aim for 2-3 sets on each leg, holding the stretch for 30-45 seconds. Perform this stretch daily, especially after long periods of sitting or before and after a workout.
- Progression: To deepen the stretch, you can raise the arm on the same side as your back leg straight up towards the ceiling. For an even greater quadriceps stretch, you can try to carefully reach back and hold your back foot, gently pulling your heel towards your glute (only attempt if you have good balance and flexibility).
- Common Mistake to Avoid: The biggest error is arching the lower back while lunging forward. This negates the stretch on the hip flexor and can compress the lumbar spine. Always initiate the stretch by tucking your pelvis under first, and only lunge as far as you can while maintaining that neutral pelvic position. If your back starts to arch, you’ve gone too far.
8-Exercise Comparison for Lower Back Pain Relief
| Exercise | Implementation Complexity 🔄 | Resource Requirements ⚡ | Expected Outcomes 📊 | Ideal Use Cases 💡 | Key Advantages ⭐ |
|---|---|---|---|---|---|
| Dead Bug Exercise | Low — supine coordination; requires form control | Minimal — no equipment; time-efficient | Deep core activation; improved lumbar stability; slow strength gains | Rehab, prevention, beginners, acute/chronic back pain | ⭐⭐⭐⭐ — Safe for spine; scalable; no equipment |
| Bird Dog Exercise | Moderate — balance and proprioception required | Minimal — mat recommended; bodyweight | Multiplanar stability; glute and erector spinae strengthening; improved posture | Post-surgical rehab, functional training, progressive strength work | ⭐⭐⭐⭐ — Builds coordination, balance, and functional strength |
| Cat‑Cow Stretch (Marjaryasana‑Bitilasana) | Very low — rhythmic spinal movement with breath | None — very quick to perform | Increased spinal mobility; reduced stiffness; improved circulation | Warm‑up, daily mobility, desk workers, gentle pain relief | ⭐⭐⭐ — Gentle mobilization; promotes breathing and circulation |
| Glute Bridge Exercise | Low — simple hip hinge from supine; cueing matters | Minimal — no equipment; progress with band/weight | Stronger glutes; reduced lumbar load; improved pelvic stability | Glute activation programs, postpartum rehab, strength training | ⭐⭐⭐⭐⭐ — Direct glute targeting; scalable; reduces compensatory lumbar strain |
| Quadruped Supine Hold (Planks & Mods) | Moderate → High — depends on variation and duration | Minimal — no equipment; time-efficient holds | Increased isometric core endurance; improved postural stability | Chronic LBP management, core programs, athletes (not ideal for acute pain) | ⭐⭐⭐⭐ — Time‑efficient, evidence‑based for endurance; many progressions |
| Child’s Pose (Balasana) | Very low — passive restorative pose | None — safe and easy to perform | Gentle spinal decompression; reduced muscular tension; calming effect | Acute relief, cool‑down, relaxation, desk breaks | ⭐⭐⭐ — Safe for most; restorative and low‑risk |
| Supine Hamstring Stretch | Low — passive stretch with strap optional | Low — strap/towel helpful but optional | Improved hamstring flexibility; reduced posterior chain tension; better pelvic alignment | Flexibility routines, post‑workout, PT for hamstring‑related LBP | ⭐⭐⭐ — Targets hamstring tightness that contributes to LBP; gentle |
| Quadriceps & Hip Flexor Stretch | Low — half‑kneeling best for pelvic control | None — mat optional; partner/strap rarely needed | Improved hip extension; reduced anterior pelvic tilt; better posture | Desk workers, posture correction, athletes, hip mobility work | ⭐⭐⭐⭐ — Addresses a common LBP contributor; complements core/glute work |
Integrating Movement into Your Pain Management Plan
You’ve now explored a curated collection of eight foundational exercises for lower back pain, each chosen for its safety, effectiveness, and adaptability. From the core-stabilising power of the Dead Bug and Bird Dog to the gentle release offered by Child’s Pose and the Cat-Cow stretch, you possess a versatile toolkit to start reclaiming control over your back health. The journey from chronic discomfort to resilient strength is not about a single, magic cure; it is about building a consistent, intelligent, and compassionate movement practice.
The key takeaway is that managing lower back pain is an active process, not a passive one. While rest has its place, particularly in acute phases, lasting relief is built on a foundation of strength, stability, and mobility. The exercises detailed in this article, such as the Glute Bridge and Plank variations, are designed to address the common root causes of back pain, like weak glutes, an unstable core, and tight hip flexors. By integrating these movements into your routine, you are not just alleviating symptoms; you are fundamentally changing the support structure for your spine.
Building a Sustainable and Effective Routine
Consistency will always triumph over intensity when it comes to therapeutic exercise. The goal is to create a sustainable habit that supports your body long-term.
- Start Small and Be Patient: Aim for 10-15 minutes of dedicated movement each day rather than one gruelling hour-long session once a week. This approach makes the habit easier to form and reduces the risk of overexertion or injury.
- Listen to Your Body’s Feedback: The “no pain, no gain” mantra has no place here. You should feel your muscles working, but you should not feel sharp, shooting, or worsening pain. As we’ve emphasised, pay close attention to the “red flags” and know when to stop.
- Focus on Form Over Numbers: Performing five Glute Bridges with perfect form, engaging your core and glutes correctly, is far more beneficial than doing 20 with a hyperextended back. Quality of movement is paramount for re-educating your neuromuscular system and building functional strength.
Think of these exercises for lower back pain as a dialogue with your body. Each repetition is an opportunity to check in, notice what feels tight or weak, and respond with mindful, controlled movement. This body awareness is a skill that will serve you not just during your exercise routine, but throughout your entire day, from how you sit at your desk to how you lift groceries.
Beyond the Mat: A Holistic Approach to Back Health
While this curated list of exercises is a powerful starting point, it’s one crucial component of a broader, holistic strategy for a pain-free life. To achieve lasting results, consider how your daily habits and environment contribute to your back health.
Actionable Insight: Your 15 minutes of exercise cannot undo eight hours of poor posture. True pain management involves integrating mindful movement and ergonomic principles into your entire day.
Consider these complementary strategies:
- Ergonomic Audit: Evaluate your workstation. Is your monitor at eye level? Do your feet rest flat on the floor? Simple adjustments, as recommended by Australian workplace health and safety guidelines from sources like Safe Work Australia, can significantly reduce the daily strain on your lumbar spine.
- Postural Awareness: Set reminders to get up and move every 30 minutes. When standing, distribute your weight evenly. When sitting, aim for a neutral spine, with your shoulders relaxed and back against your chair.
- Professional Guidance: While self-management is empowering, professional assessment and hands-on treatment can accelerate your recovery. A skilled therapist can identify specific muscular imbalances, release chronic tension, and provide personalised advice that complements your exercise routine.
By combining these targeted exercises for lower back pain with improved daily habits and professional support, you create a powerful, multi-faceted defence against discomfort. You move from a reactive cycle of pain and rest to a proactive state of building resilience, empowering you to live a more active, vibrant, and unrestricted life. This isn’t just about escaping pain; it’s about building a body that is strong, capable, and ready for whatever life throws your way.
A targeted exercise plan is a fantastic step, but combining it with expert hands-on treatment can unlock faster and more profound relief. The team at Swift Results Massage Therapy specialises in remedial techniques that release deep muscular tension and correct the imbalances that often cause lower back pain, perfectly complementing your new exercise routine. Visit Swift Results Massage Therapy to book a consultation and create a comprehensive, personalised plan for a stronger, pain-free back.
